Kitchen cabinet crown molding can make an unfinished cabinet run feel intentional. It can also add visual weight where a cleaner edge would work better. The right choice depends on the ceiling, door style, cabinet depth, and the look you want to keep.
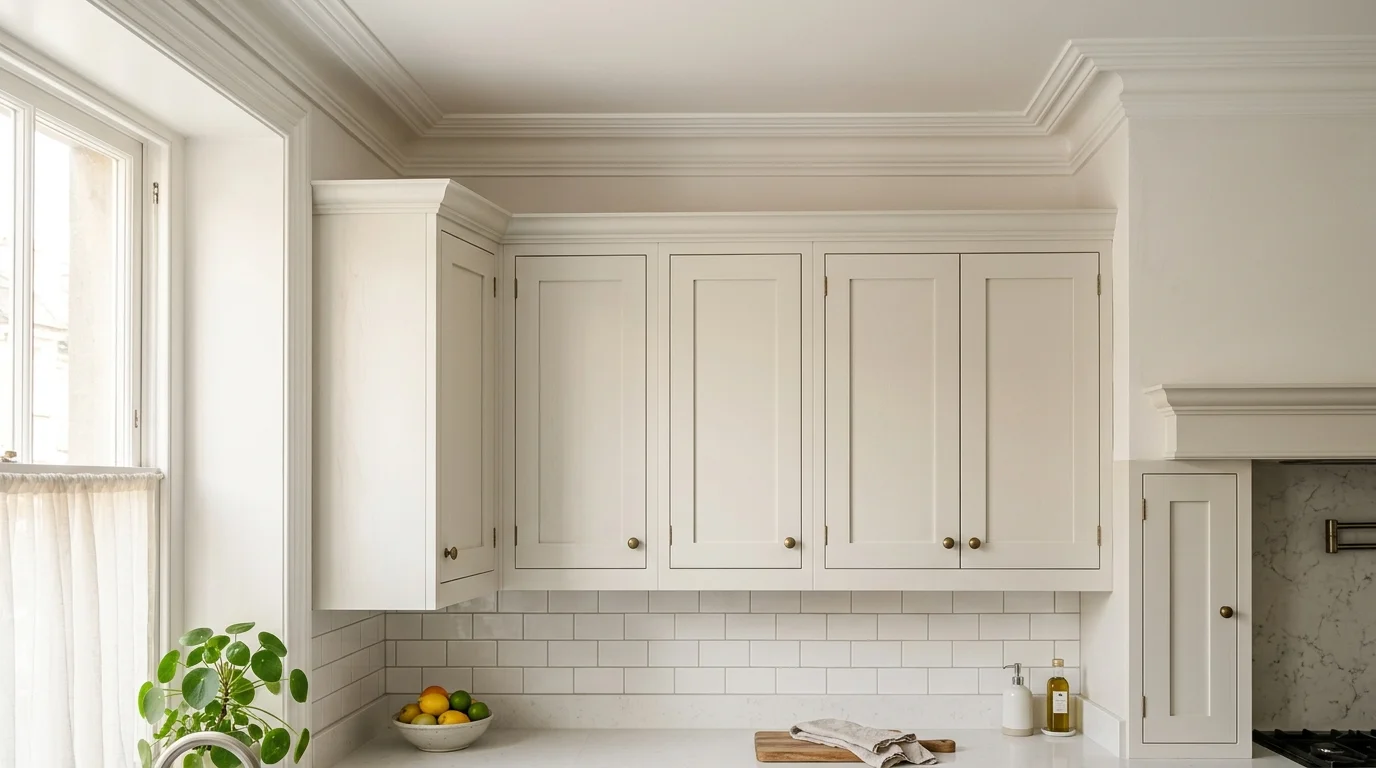
What crown molding does to a cabinet run
Crown molding handles the transition between upper cabinets and the space above them. It can close a visible gap, soften the top edge, or connect cabinetry to the ceiling. The result often feels more built-in than a cabinet box ending on its own.
That doesn’t mean every kitchen needs it. Crown changes where your eye stops. A heavier profile draws attention upward and makes the cabinet run feel more formal. A narrow profile creates a quieter finish. No crown leaves a crisp horizontal edge that may suit flat-panel doors and restrained interiors.
Start by looking at the whole elevation, not a molding sample. Door rails, appliance panels, cabinet end panels, and nearby room trim all affect the choice. An ornate crown can fight simple slab doors. A plain square-edged build-up can look natural with either slab or Shaker fronts.
Proportion matters more than decoration. Crown shouldn’t look like a separate strip perched on the cabinet. Its depth and projection should relate to the door details below it. The transition should also look resolved at cabinet ends, corners, and changes in depth.
Crown can hide small visual gaps, but it shouldn’t become camouflage for a poor cabinet layout. Uneven ceiling lines need a planned transition. Filling every variation with a large decorative profile may make the irregularity more noticeable.
When cabinetry is being designed from scratch, custom kitchen cabinets give the remodeler more control over cabinet height, fillers, end panels, and crown proportions. For existing boxes, a simpler top treatment is often easier to integrate.
Ceiling height changes the answer
Ceiling height affects both the crown profile and the amount of open wall above it. A cabinet run that stops well below the ceiling creates a distinct upper gap. Crown can finish the cabinet, but it won’t make that gap disappear unless the entire top treatment reaches the ceiling.
That difference matters. Crown attached only to the cabinet reads like furniture trim. Crown carried to the ceiling reads more like built-in millwork. Both can work, but they create different visual endings.
Low ceilings usually benefit from restraint. A tall, layered crown can make the upper cabinets feel crowded. A narrow molding, shallow riser, or square-edged filler keeps more visual breathing room. Matching the molding color to the cabinets also reduces contrast.
Higher ceilings create another challenge. Extending a small crown upward won’t fill a large gap convincingly. The better answer may be taller upper cabinets, stacked cabinets, or a deliberate open area. The design shouldn’t pretend a wide space is a tiny finishing detail.
Ceilings that slope or vary across the cabinet run require special attention. A tight ceiling connection can reveal every change in that line. A small shadow gap or scribed filler may look calmer than crown forced into an uneven transition.
View the planned elevation from the main kitchen entrance. Then check it from adjoining spaces. San Diego County homes can place kitchens beside dining areas, halls, or open living spaces. The cabinet top should make sense from those longer views, not only while standing at the counter.
If crown is part of broader remodeling work, building permits may be required depending on the scope. The City of San Diego Development Services can help city residents confirm current requirements. Homeowners elsewhere in San Diego County should check with the authority serving their property.
Stacked, single and light rail options
A single crown profile is the most direct approach. One molding runs along the cabinet tops and returns neatly at exposed ends. This works when the cabinet height already feels balanced and the ceiling gap doesn’t need a complicated transition.
A stacked treatment combines several pieces. A flat riser may extend above the cabinet before a finishing profile turns toward the ceiling. This gives the installer more control over height and projection. It can also make standard cabinet boxes look more architectural.
Stacked crown needs discipline. Each layer creates another line, shadow, and corner. Too many layers can overwhelm narrow doors or compact kitchens. The stack should support the cabinet design rather than compete with it.
Cabinets that reach the ceiling may use a scribed filler below the crown. The filler lets the upper edge follow small ceiling variations while the visible molding stays orderly. On very simple cabinetry, the filler itself may become the finish. A clean panel or narrow reveal can replace a curved profile.
Light rail serves a different purpose. It runs along the lower edge of upper cabinets, often hiding under-cabinet components from normal sightlines. Because it sits below the doors, it doesn’t solve the upper transition. Still, light rail and crown must be selected together. A heavy detail at both edges can make the cabinet faces feel boxed in.
Refacing creates its own decision. New doors and finished cabinet skins can change the style while the existing box heights remain. During kitchen cabinet refacing, ask whether the current crown can stay, needs modification, or should be replaced. Our cabinet refacing guide explains the larger set of choices around keeping existing cabinet boxes.
Before approving a profile, review a full-size sample against an actual door. Small catalog images can hide how far molding projects. Check inside and outside corners, cabinet ends, and transitions near a refrigerator surround or tall pantry.
Installing on frameless cabinets
Frameless cabinets need a clear attachment plan because the cabinet box and door define the visible front edge. There isn’t a projecting face frame to disguise every fastener or alignment change. Crown usually needs a supporting strip, riser, or finished panel above the box.
Door clearance comes first. The crown assembly shouldn’t interfere with doors opening near the ceiling. This is especially important with full-overlay doors, where the door covers most of the cabinet front. Check corner doors and cabinets beside tall panels as well.
The front setback also changes the finished look. Crown aligned too far forward can appear top-heavy. Set too far back, it may look disconnected from the doors. A mock-up helps establish a consistent relationship between the crown, door plane, and end panels.
Finished cabinet ends deserve equal attention. The support behind the crown shouldn’t remain exposed when viewed from the side. A return, matching end skin, or continued panel can complete the transition. Open shelves and cabinets at changing depths need planned stopping points rather than abrupt cuts.
Wall and ceiling conditions also affect the installation. Crown pieces may meet surfaces that aren’t visually straight. A remodeler can plan scribes, fillers, and shadow lines before cutting the finish material. Caulk alone shouldn’t be expected to solve a visibly uneven transition.
If you’re keeping frameless boxes and changing only the fronts, inspect the cabinet structure before selecting new trim. Crown adds little value when the underlying box alignment remains distracting. Refacing works best when the retained cabinets support the intended layout and finish.
For a larger redesign, compare the crown decision with door style, panel treatment, and upper cabinet height at the same time. That prevents the top trim from becoming a late addition that doesn’t match the cabinetry below.
Modern alternatives to crown
Modern kitchens don’t require a decorative crown to look finished. A flat filler panel can connect cabinets to the ceiling with fewer lines. This approach works well with slab doors, narrow reveals, and cabinetry intended to read as one continuous volume.
A shadow gap offers another option. Instead of hiding the transition, it creates a controlled dark line between the cabinetry and ceiling. The reveal must remain consistent to look deliberate. Uneven widths can make the gap appear accidental.
Some designs stop the cabinets below the ceiling and leave the wall exposed. That choice works when the stopping line is clear and repeated across the run. The cabinet tops and surrounding surfaces should still receive a finished treatment. Leaving a gap isn’t the same as ignoring it.
Tall upper cabinets can reduce the need for applied molding. A small ceiling filler may be enough to complete the installation. Stacked upper cabinets offer a more detailed alternative, especially when the upper tier repeats door proportions found elsewhere. Glass fronts can lighten that upper zone, while solid fronts keep it quieter.
The best modern alternative often comes from simplifying nearby details. Flat end panels, restrained hardware, and a clean backsplash termination can support a square cabinet top. Adding crown to that composition may introduce a style the rest of the kitchen doesn’t share.
Color affects the decision too. Crown painted to match the cabinetry becomes part of the cabinet mass. Crown matched to the room trim can divide the top visually. Either approach can work, but the change should appear intentional at every return and adjoining wall.
Don’t choose crown from a trend photo alone. Compare it with your actual ceiling line, door profile, and room trim. A design that looks calm in one elevation can feel busy when wrapped around several cabinet depths.
When to call us
A licensed kitchen remodeler is a sensible choice when crown must follow uneven ceilings, wrap multiple cabinet depths, or coordinate with new cabinetry. You can verify a contractor through the CSLB License Check before hiring. Call us at (858) 400-4623 and we’ll connect you with a licensed local kitchen remodeler.