Pendant lights can make an island feel finished, or crowded and dim. The key decisions are mounting height, fixture count, spacing, and light control. Start with the island’s actual dimensions, then test the layout before anyone opens the ceiling.
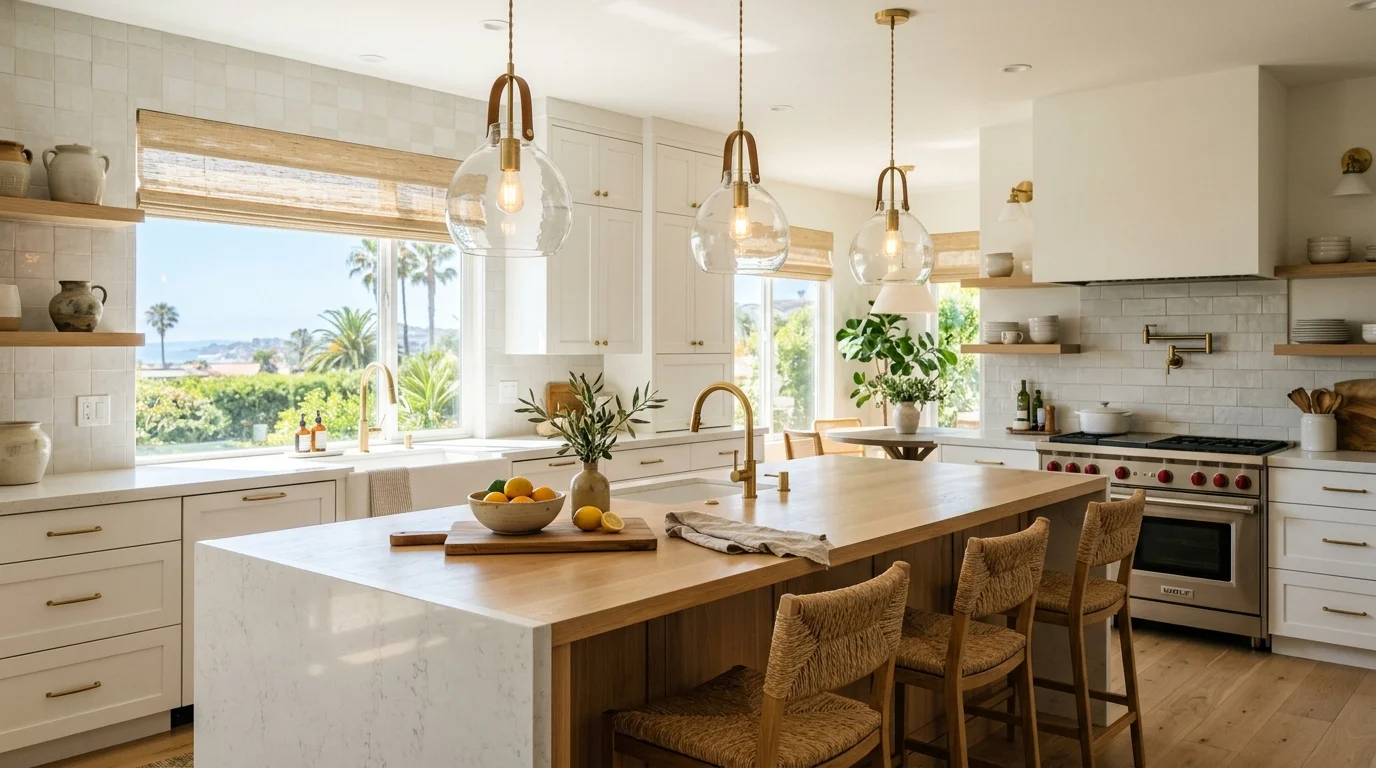
How high to hang a pendant
Measure pendant height from the finished countertop to the fixture’s lowest point. Don’t measure from the floor or an unfinished cabinet box. The final counter thickness can change the visible clearance.
Use a mock-up to choose an initial position above the counter. Adjust it for the room, fixture, and people using the island.
Raise the pendant if it interrupts views across the kitchen. A higher position may also suit a broad shade that spreads light widely. Lowering a small fixture can create a more focused pool of light. Stop before the fixture becomes an obstacle or produces uncomfortable glare at eye level.
Check the layout while sitting and standing. Look from the island seats, sink, cooking area, and nearby room. A fixture that looks right from the doorway may block conversation across the counter.
Ceiling shape matters too. Sloped ceilings may need compatible canopies or adjustable suspension parts. A fixed stem offers less adjustment than a cord. Confirm the available lengths before ordering, especially when several fixtures must finish at the same height.
Make a quick mock-up with string and a paper shade outline. View it during daylight and after dark. This small test reveals height problems that a catalog image can’t show.
When several pendants share the island, align their lowest visible points. Don’t rely only on cord length. Hand-blown glass and sculptural shades can vary slightly, so the installer should check the visible fixture bodies.
Spacing for two, three or one fixture
One fixture usually creates a single visual anchor. Two fixtures produce a simple, balanced layout. Three work well when narrow pendants need to cover a longer island. Fixture width and light output matter more than the number alone.
Begin by drawing the island’s centerline. For one pendant, place the first mark at the island’s midpoint. For two, use the one-third and two-third points as initial marks. For three, begin at the one-quarter, halfway, and three-quarter points.
Those fractions aren’t final installation rules. They’re an easy way to establish symmetry. Move the marks if a sink, cooktop, seating zone, ceiling beam, or fixture width changes the composition.
Measure spacing from fixture center to fixture center. Use the actual shade width as a practical visual check. Wide fixtures need more room. Two large shades can look crowded even when their electrical boxes are evenly spaced.
Also check the outer shade edges against the island ends. The fixtures should appear contained within the countertop’s footprint when viewed from above. Equal end margins usually look calmer than one pendant sitting noticeably closer to an edge.
A 96-inch island offers a simple planning example. Three quarter-point marks land at 24, 48, and 72 inches from one end. Two initial marks land at 32 and 64 inches. Those positions still need adjustment for the actual shade diameter.
Don’t add a third pendant just to fill an empty mark. One substantial linear fixture may suit the island better. Likewise, three slim pendants can feel lighter than two bulky ones. Compare both the spacing and the total visual mass.
Mark every proposed center with painter’s tape. Then hang paper circles matching each fixture’s widest dimension. This makes overcrowding obvious before the ceiling boxes are placed.
Scale against island size
Fixture scale starts with three measurements: island length, island width, and shade diameter. Product photos can be misleading because they rarely show the countertop dimensions. Use the manufacturer’s listed dimensions, not a visual guess.
A narrow island can be overwhelmed by deep shades. A long island can make tiny pendants look scattered. The goal is a clear relationship between the island and the whole fixture group.
First, outline each shade on the countertop with paper or painter’s tape. This top-down view shows how much visual space the fixtures occupy. Keep the composition centered unless the island has a deliberately offset working zone.
Next, test the fixtures at eye level. Shade height affects scale just as much as width. A tall, narrow pendant may look light from below but heavy across the room. Clear glass can feel less solid than an opaque metal shade of equal size.
The ceiling also changes how scale reads. More open space above a fixture can make it feel smaller. A low soffit can make that same fixture feel compressed. Test the full hanging length rather than judging the shade alone.
Island design should come first when both elements are changing. Finalize the countertop length, overhang, seating, and work zones before fixing lighting centers. Our kitchen island design guide explains how those decisions fit together.
If the island itself is being added or replaced, a kitchen island build and replacement pro can coordinate its final footprint with the lighting plan. Modern Kitchen SD connects homeowners with licensed, independent local kitchen remodel professionals. The matched professional performs the physical work.
Dimming and layered light
Island pendants shouldn’t carry the whole kitchen lighting plan. A useful layout combines general room light, focused work light, and softer light for evenings. Each layer should have a clear job.
Downward-facing shades can concentrate light on the countertop. Diffused glass spreads light more broadly. Clear glass exposes the bulb and may create glare from some viewing angles. Check the fixture after dark before choosing the final hanging height.
Dimming helps the island change roles. Food preparation may need brighter task light. Dining, homework, or conversation may suit a lower setting. Put the island fixtures on a control that lets them operate separately from surrounding ceiling lights when the project allows it.
The bulb, fixture driver, and dimmer must work together. A dimmable label on one component doesn’t confirm that the whole combination will perform well. Ask the installer to confirm compatibility using the manufacturers’ documentation.
Keep the light appearance coordinated across nearby fixtures. Pendants, recessed lights, and under-cabinet lighting can look disconnected when their color differs sharply. Test a sample bulb beside the cabinets, counters, and backsplash. Dark finishes absorb more light, while polished surfaces can reflect bright points.
The current kitchen-specific fixture and control rules couldn’t be confirmed here, so this guide doesn’t state a legal efficacy, wattage, or dimmer requirement. A licensed professional should check the current California Energy Commission standards for the project.
For help coordinating fixtures, controls, and the remodel plan, see our kitchen electrical and lighting service. The independent pro you select can review the room and specify suitable components.
Wiring an island that has no light now
Adding pendants where no ceiling light exists starts with access, not fixture style. The professional needs to determine how power and control wiring can reach the proposed locations. Attic space, finished rooms above, ceiling framing, and existing switches can change the route.
Finalize the fixture centers before wiring begins. Use the installed cabinet and countertop edges as reference points. Plans can shift during construction, and a small island change becomes obvious when pendants remain fixed overhead.
Ask the professional to review five items before work starts: the power source, switch location, ceiling access, fixture support, and surface repairs. Discuss whether drywall will need opening and who will handle patching and paint. These details belong in the project scope.
Choose the fixtures early enough to review their canopies and mounting parts. A small canopy leaves little room to hide an imperfect ceiling opening. Heavy or unusual fixtures may also affect the planned mounting approach. Follow the fixture manufacturer’s instructions and the professional’s project review.
Building permits may be required depending on the scope. This page doesn’t claim that one specific lighting change always requires a permit. For a property within the City of San Diego, contact Development Services about the current requirements. Elsewhere in San Diego County, confirm the correct permitting authority for the project address.
Don’t assume a rule from another city applies to your home. Ask the professional who will handle any required application, inspection, or documentation. Get that responsibility recorded in the written scope.
California homeowners can also check a contractor through the CSLB License Check tool. License verification confirms legal status, but it doesn’t guarantee work quality. Review the project scope, fixture details, and responsibilities before signing.
When to call us
Pendant lighting needs a licensed kitchen remodeling pro when wiring must be added, moved, or coordinated with a new island. Call us at (858) 400-4623 and we’ll connect you with a licensed local kitchen remodeler.